
Pick one clip. See every place it's used across your entire project – then select every instance at once.
Overview
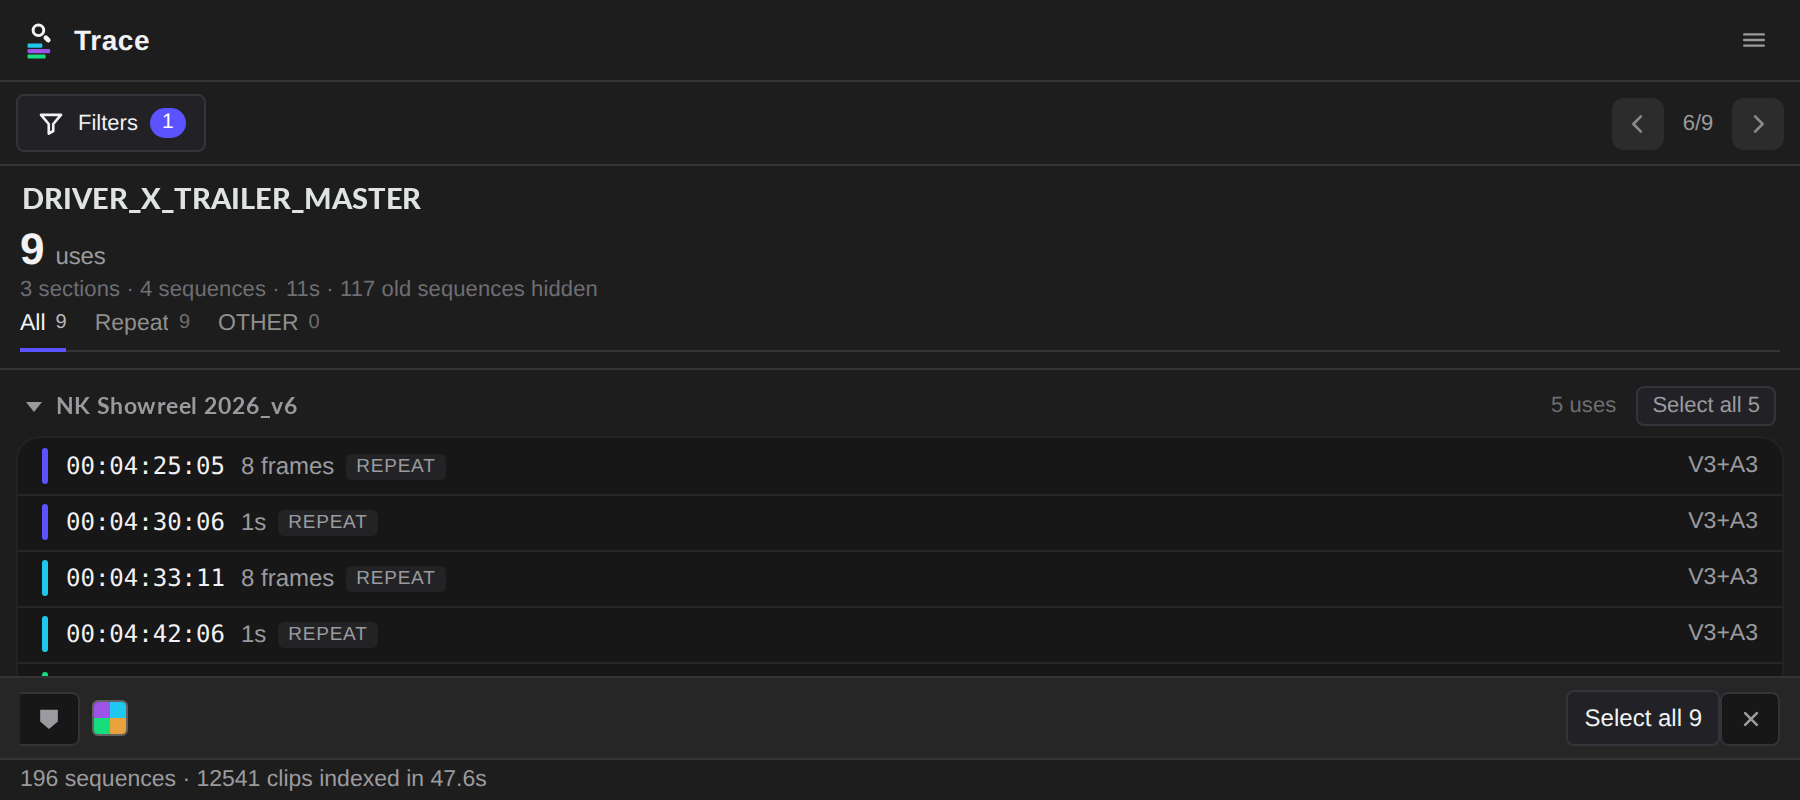
Click a clip in the Project panel and Trace shows every place it is used — which sequences, which timecodes, how long, and how much of the source you have actually touched. Then one button selects every instance in the timeline at once.
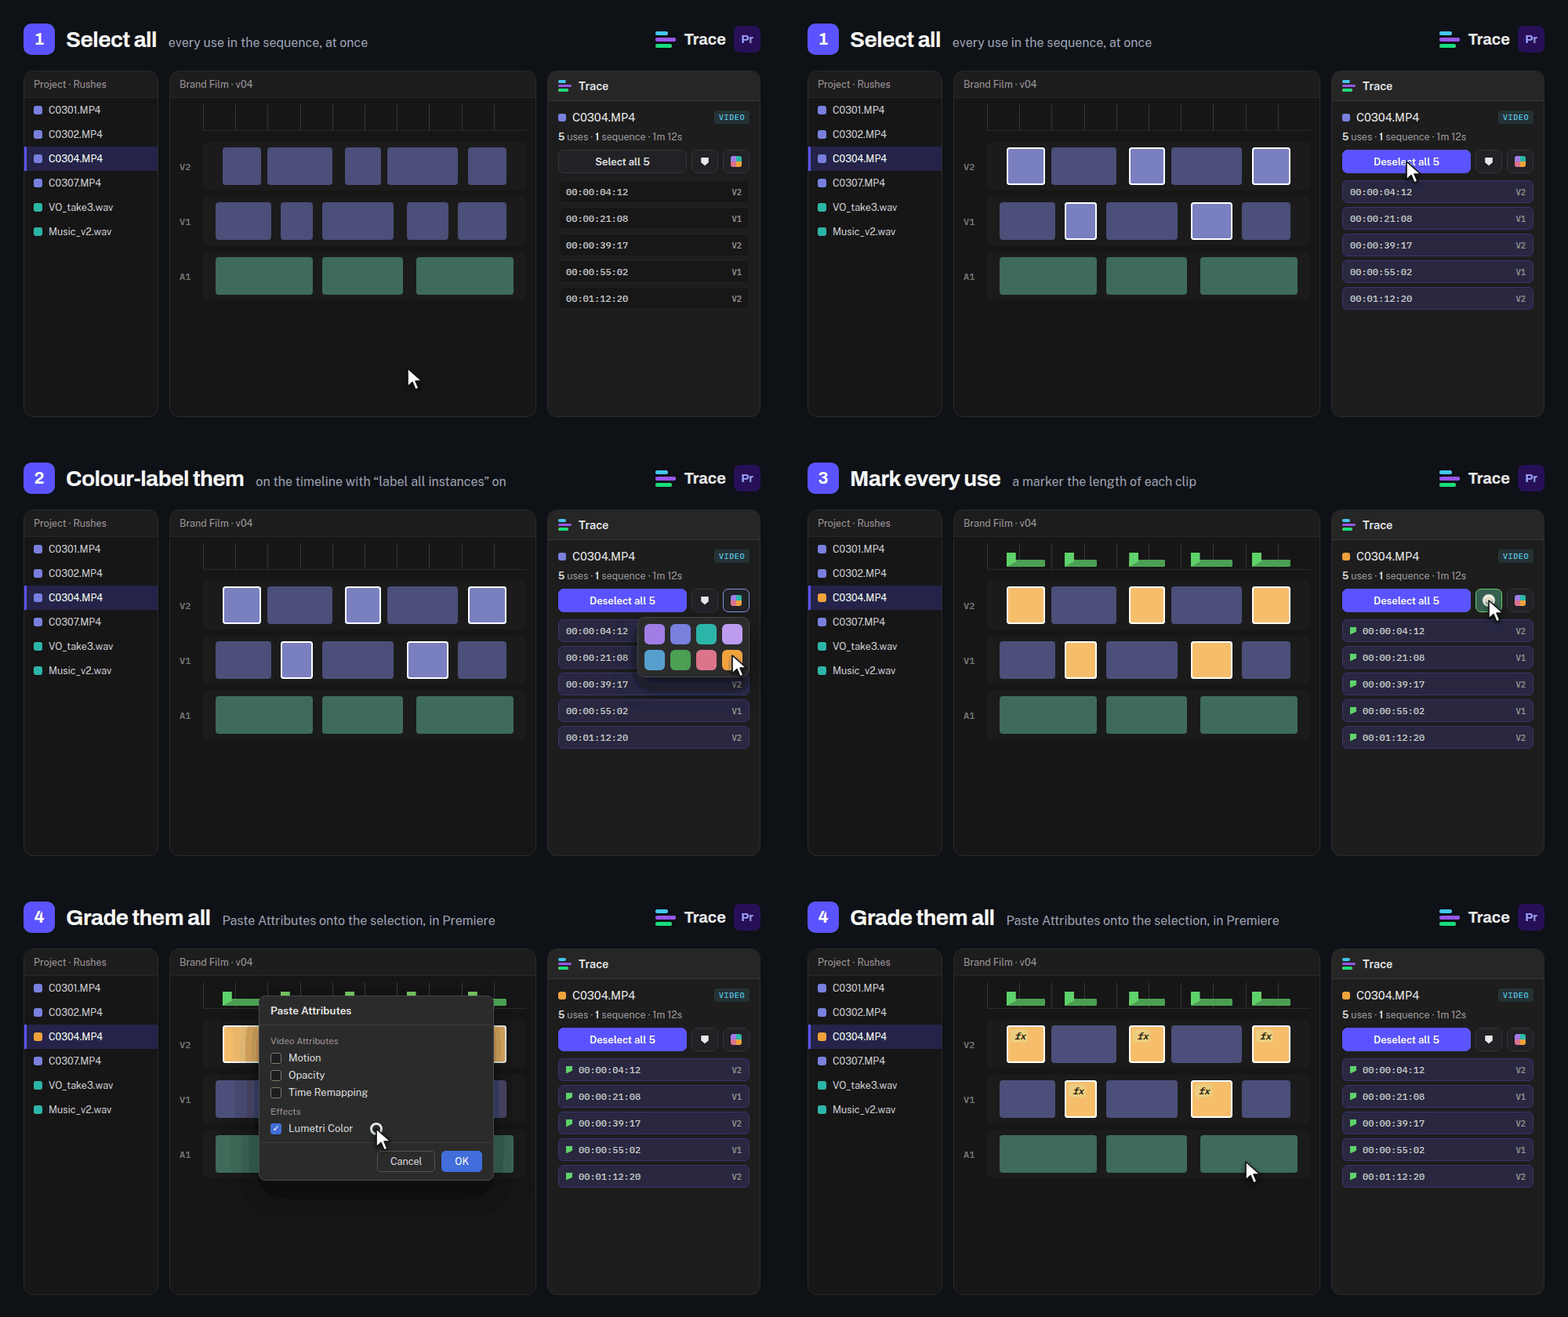
The part that matters most: a selection is not a list. Once nine uses are selected they are a real Premiere selection — nudge them, delete them, apply an effect, colour them. Everything else that answers "where is this clip?" hands you a list and makes you visit the entries one at a time.
Premiere can already find your clips. The Video Usage column does it, and Sequence Index (26.2) lists what is in one sequence. Both are good, and Trace does not replace either.
What neither can do is select every instance simultaneously, give you a total, resolve through nested sequences, or ignore your archived versions. That is the whole of what Trace is for.
What Trace is not
Trace answers one question — where is this clip used? — and it is worth being blunt about everything it deliberately isn't, so you know inside a minute whether it is the tool you want.
| It is not | What you actually want |
|---|---|
| A media manager | Trace never moves, renames, copies, consolidates or deletes a single file. It reads. |
| An unused-media finder | Trace scans the clip you selected. "What media in this project is not used?" is a different question — that is Trace+. |
| A duplicate finder | It shows repeats of one clip, not every duplicated asset in the project. Also Trace+. |
| A project archiver or trimmer | It will not shrink your project folder or collect only the used media. Trace+. |
| A reporting or export tool | No CSV, no PDF, no cue sheet. Copy list puts plain text on the clipboard, and that is the whole of it. |
| A search tool | You cannot type a filename into Trace. It follows what you select, on purpose — nothing to configure and nothing to learn. |
| A replacement for the Video Usage column | A different question, not a better version of the same one. Use both. |
| Something that edits for you | It moves the playhead and makes selections. Only if you ask does it add markers or set in/out points. It never cuts, trims or ripples. |
| A subscription, or a trial | Free. No account, no key, no sign-in, no expiry, nothing to cancel. |
It is also not a panel most people open every day. It earns its place on the days you inherit someone else's project, hunt a clip you know you used somewhere, or need to know what a forty-minute interview actually gave you.
Requirements
| Premiere Pro | 25.6 or newer. Check under
Premiere Pro > About Premiere Pro. Earlier versions cannot run it — Trace uses
Adobe's current plugin system (UXP), and there is no build for older releases. |
|---|---|
| System | macOS or Windows. |
| Licence | None. Trace is free, with no account and no key. |
Install
- Open the download link in your email, then download
trace.ccxand double-click it. Creative Cloud Desktop installs it for you — nothing to unzip. Nothing arrived? Check spam, then email me and I will send it directly. - Quit Premiere Pro and open it again. Premiere only looks for new panels at startup.
- Window > UXP Plugins > Trace.
That is all of it. There is no third step where you paste a key.
Double-clicking did nothing? Open Creative Cloud Desktop first, then double-click the file again. Still nothing, or a message saying Creative Cloud cannot open it? Install it from Terminal or Command Prompt instead. It is one line to paste.
Quick start
- Open a project and dock Trace anywhere you like.
- Click a clip in the Project panel. Trace scans the project once — a few hundred milliseconds on a normal job — then answers instantly from then on.
- Click any row to jump the playhead to that use.
- Press Select all — on a sequence’s own header for that cut alone, or in the bar at the foot of the panel for everything on screen — and every use becomes a real Premiere selection at once.
With nothing selected, Trace waits. That is the whole loop; everything below is detail.
Repeats and sections
“Nine uses” and “nine different bits of footage” are not the same sentence. Nine uses of one three-second cutaway and nine moments of an interview are opposite facts about a job, and the use count alone cannot tell them apart.
So when they differ, the totals line says both: 9 uses · 4 sections · 2 sequences. Four sections means four distinct stretches of the source were used; the other five uses are repeats of footage already counted.
And every use that shares its footage with another carries a REPEAT badge on its row, so you can see which ones they are rather than only how many.
It is not shown when it would say nothing. A clip cut into nine different places reads 9 uses with no section count, because “9 uses · 9 sections” on every clip is a line people stop reading.
Every member of a group is badged, not just the later ones. Two uses of one section are repeats of each other — picking one to call the original would invent an order your project does not have.
Two slightly different trims still count as one section. The test is whether the two uses share more than half of the shorter one, so re-trimming a cutaway by a few frames does not turn it into a new section — and a brief overlap at a dissolve does not make two sections into repeats.
One clip at a time
Trace scans the clip you select, and nothing else. There is no view to switch, no mode, no setting. Click a clip, a subclip, an audio file or a sequence in the Project panel and Trace shows every place it is used. Click away and it waits.
That is the whole shape of it, and it is deliberate: a panel that only ever answers one question needs no explaining. If you want the same answer for many clips at once — what a whole sequence reuses, what media the whole project is not using — that is Trace+.
A sequence counts as a clip. Select one and Trace tells you where that sequence is nested, the same way it would for any other item.
Finding every use of a clip
Select a clip and Trace answers with a total line — 9 uses · 4 sequences · 3m 12s — and then the detail: every sequence it appears in, and inside each one, every use with its timecode, its duration and which track it sits on.
Each sequence’s uses sit in a card of their own, with the sequence name as a caption above it. A clip cut into four different timelines reads as four things at a glance rather than one long column of timecodes.
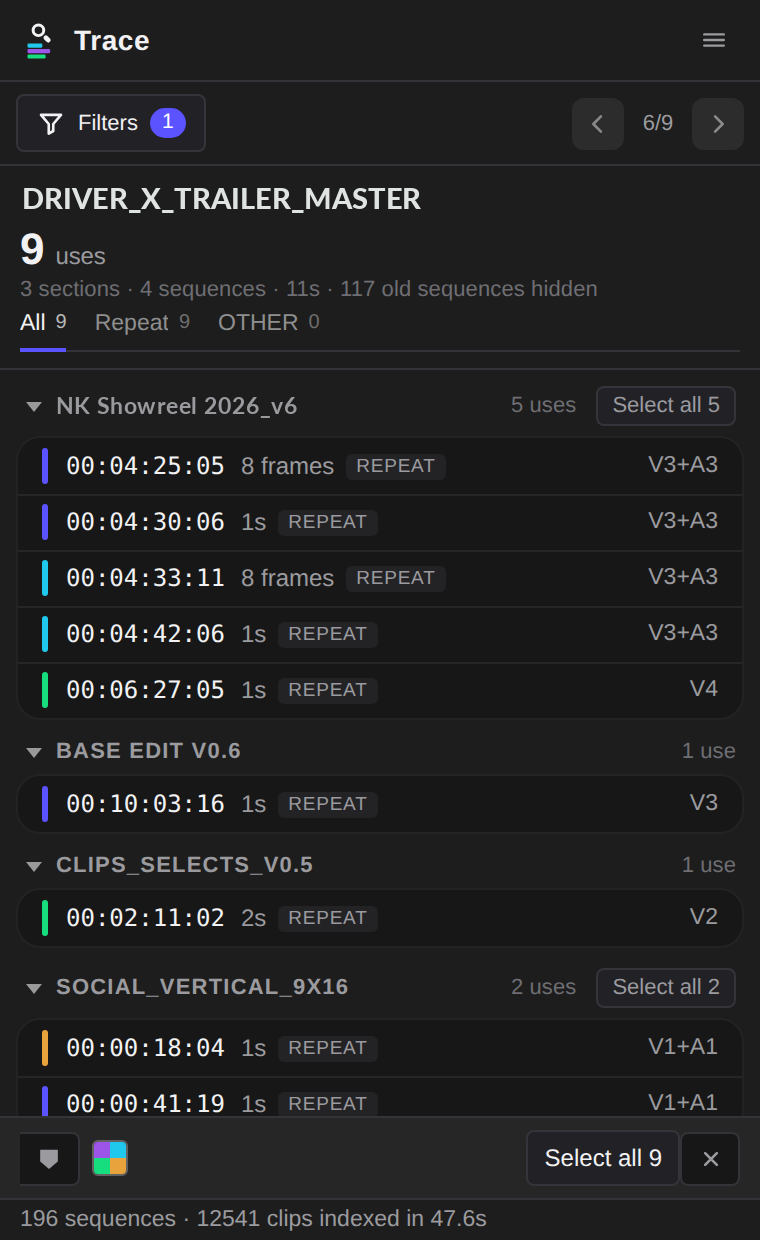
Click a sequence name to open or close that card and nothing else, so you can have as many open at once as you like. Cmd / Ctrl-click one to collapse all the rest — the tidy-up, for when the list has got long.
The coloured bar at the start of each row is which part of the source that use came from. Two uses of the same footage share a colour; a genuinely different moment gets a different one. Nine cuts from one three-second cutaway are one colour, not nine.
Audio and video that were shot together and are cut together count as one use, not two. Trace pairs them when they overlap by more than half, so a J-cut stays one use and two back-to-back edits stay two.
The list updates as you edit. Add a clip, delete one, or move something, and Trace notices within about a second and re-walks only the sequence that changed. ☰ > Re-scan project forces a full pass if you would rather not wait.
It does not re-read the whole project on a timer. Every so often Trace checks whether anything has moved by reading the track counts — a fraction of the cost of a real scan — and only re-walks the sequences that actually changed. On a large project that is the difference between a few seconds and well over a minute.
Selecting uses in the timeline
This is the thing nothing else does. Press Select all and every use becomes a real Premiere selection at the same moment — ready to nudge, delete, label, or drop an effect onto.
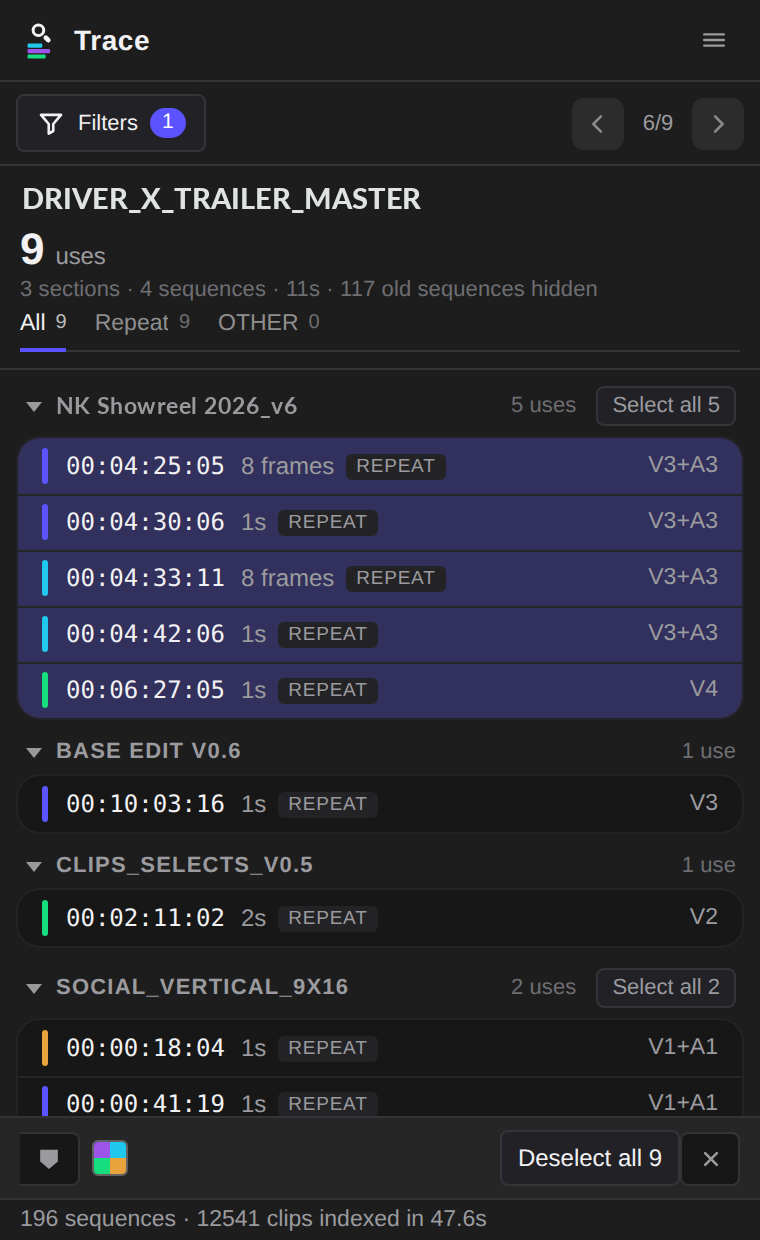
There are two of them, and they have different scopes. Each sequence card’s header carries its own Select all 5 for that cut alone; the bar pinned at the foot of the panel carries Select all 9 for everything on screen. Both say how many they will take, so you never have to guess which one you are pressing.
Dropping one you did not want
Once anything is ticked, the list becomes a selection rather than a navigator. Click any row to add it or take it out — no modifier needed. Select all nine, click the two you do not want, act on the seven that are left. The playhead still travels to whichever row you clicked.
With nothing ticked the list behaves as it always has: click a use to go there and select that one clip.
A selection cannot span two sequences — that is Premiere, not Trace. Ticking a use in a different sequence replaces your picks rather than adding to them, and the status line says so when it happens.
The bar is outside the scrolling list, so it is reachable at any scroll position. On a clip used sixteen times you no longer have to scroll to the bottom to find it.
Stepping through uses
The arrows at the top right of the panel walk the playhead through every use on screen, in order, jumping between sequences as needed. The counter between them tells you where you are — 3 / 9. The × at the right-hand end of the bar at the foot of the panel drops the selection and the picks.
Every gesture
| Do this | Get this |
|---|---|
| Click a sequence name | Opens or closes that group and leaves the others exactly as they were, so you can have as many open at once as you like |
| Cmd / Ctrl-click a sequence name | Opens that one and collapses every other — the tidy-up, for when the list has got long |
| Select all in a sequence | Every sequence header carries its own Select all with the count on it, so you can light one cut's uses without touching the rest. The bar at the foot of the panel does the same for everything on screen |
| Click a use, with nothing ticked | Jump the playhead there and select that clip |
| Click a use, with a selection running | Adds or removes it — so “select all, drop the two I don’t want” needs no modifier. The playhead still goes there |
| Shift-click, or double-click | Open in the Source Monitor, with that use set as in/out |
| Cmd / Ctrl-click, or the tick box | Add or remove from the selection |
| Alt-click | Find in Project — copies the clip's name for the Project panel's Find box (Cmd/Ctrl-F). The Find button beside the bin path does the same thing |
| The arrows | Step through every use on screen |
Shift and double-click do the same thing deliberately, so the Source Monitor is reachable whichever one you reach for.
Nested sequences
If a clip lives inside a nest and that nest is cut into a master, Trace reports
both — the use inside the nest, and where it lands in the master, labelled
via <nest name>. Native reports the first and never mentions the second, which
is the sequence you are actually working in.

via Nest A. The caveat line says how many uses came through a nest, rather
than folding them silently into the total.| Nest trimmed past the use | Not reported. The master genuinely does not contain it, and a wrong number is worse than a missing one. |
|---|---|
| Retimed nest | Mapped, divided by the speed, and marked ~ with a note under the totals. |
| Reversed nest | Not mapped at all. The arithmetic depends on where the reversal's boundaries sit, and guessing would be a confident lie. |
| Nest inside a nest | Followed, to six levels, with a guard against a sequence that somehow contains itself. |
Subclips and duplicate imports
Selecting a master clip also finds uses of its subclips, matched on the shared media file. Those rows are labelled with the name of the item they came from.
Trace cannot tell a subclip from a second import of the same file — Premiere exposes no API for that relationship — so it does not claim to. Rows say same media file and name the item, rather than saying subclip.
Merged and multicam clips
The component clips inside a merged clip, and the angles inside a multicam clip, are not resolved. When you select one, Trace says so in the line under the totals rather than quietly reporting a number that is too low.
Merged clips cannot be resolved by any plugin. Premiere exposes
isMergedClip() — enough to know that it is one — and nothing at all for reading the
sources inside it. Adobe's own answer, on the record: "There are no ExtendScript APIs around
multi-cam, and there never will be." The same gap covers merged clips, and no workaround has
ever been produced.
It costs you nothing here, and something later. Trace never moves a file, so an unresolved angle is only a short list. The same limit is dangerous the moment you archive unused media: a file used only inside a merged clip is on no timeline any plugin can see, so it reads as unused. Trace+ marks every merged and multicam clip and refuses to file those away.
Multicam was a maybe. It is now a no — tested 3 Sep 2026. The theory was that a
multicam source appears in the project as a sequence, so its angles might be reachable by the
same walk that resolves nests. They are not: a scan report on a real multicam clip shows
in getSequences(): NO. Premiere does not hand that sequence to a plugin, so
nothing inside it is ever read. Trace finds every place the multicam clip itself is cut in,
and says plainly that it has not looked inside.
Old cuts
If you keep old cuts in a _PREVIOUS, _ARCHIVE or _OLD
bin — as VersionUp creates — every native usage
list is full of them, and there is no way to filter them out.
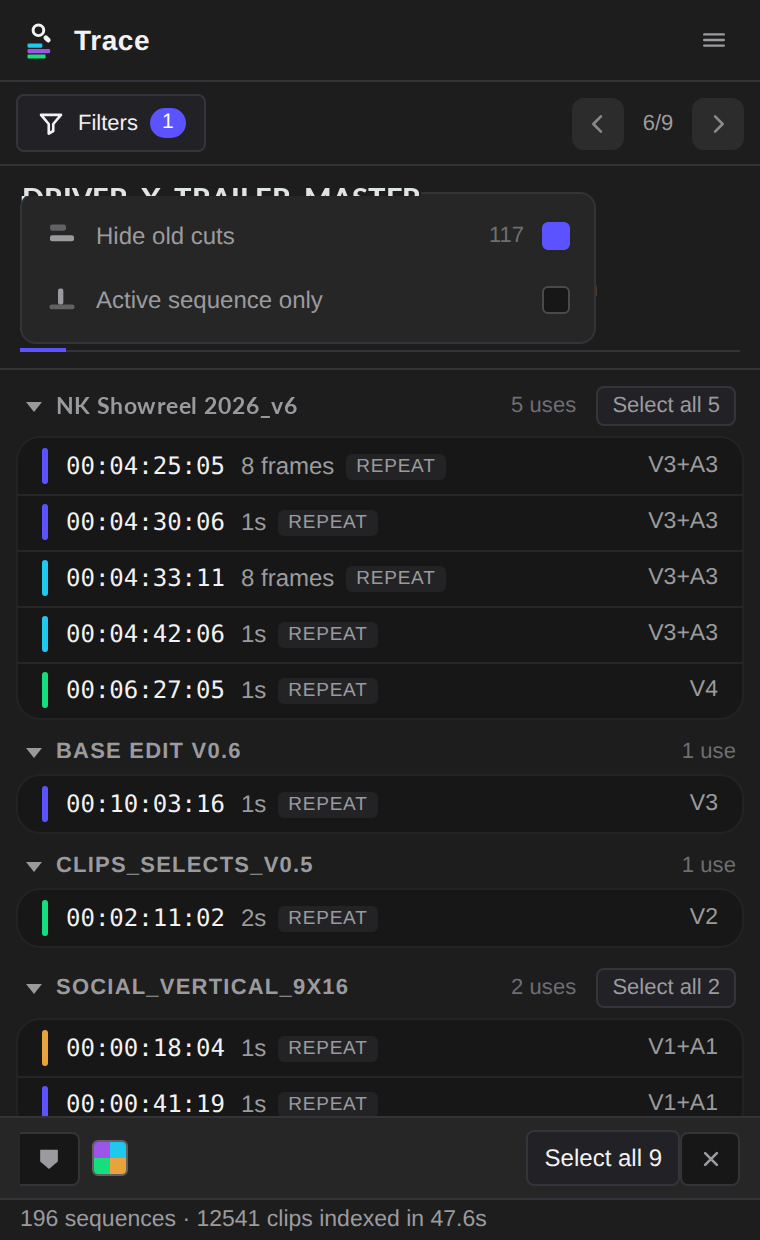
Trace hides them by default and tells you how many it is hiding. Both filters live behind the Filters button on the toolbar, which carries a badge counting how many are actually holding rows back — not how many rows the menu has. Untick to see them; the row stays on screen either way, so it is a switch and not a trapdoor.
Active sequence only is the other one: show this clip’s uses in the timeline you have open and hide the rest. On a project with four versions of the same film, “where is this used?” otherwise comes back as four groups, three of them about a cut you are not in. It greys itself with the reason in its own label when nothing is open, or when the clip is only used in the sequence you already have open and there is nothing for it to remove.
A Community Expert confirmed on the Adobe forums that native Premiere cannot do this. It is a small feature that only exists because the person who built Trace also built a versioning tool and got tired of the noise.
Adding markers
The marker button — the flag shape at the far left of the bar at the foot of the panel — drops a marker over every use on screen. Unlike a selection, a marker survives you clicking somewhere else: it is the persistent version of “highlight every use”.
The bar is grouped, and the grouping means something. The two controls that act on a selection — the marker and the colour chip — sit at the left. The two that make or unmake one — Select all and the ✕ — sit at the right. The gap between them is the only thing saying so, and it is enough.
It is one undo step per sequence, not one for the lot, and Trace tells you how many before you press it. Markers across four sequences is four presses of Cmd/Ctrl+Z.
Taking them off again. Each marker Trace adds is named Trace · and the clip’s name, with Use 3 of 5 in its comment, so they are easy to spot in Premiere’s own Markers panel (Window > Markers), where you can select and delete them. Removing every Trace marker in one press is part of Trace+.
Colouring the clip
The four-colour chip beside the marker opens Premiere’s own label colours. Pick one and the clip takes that colour in the Project panel.
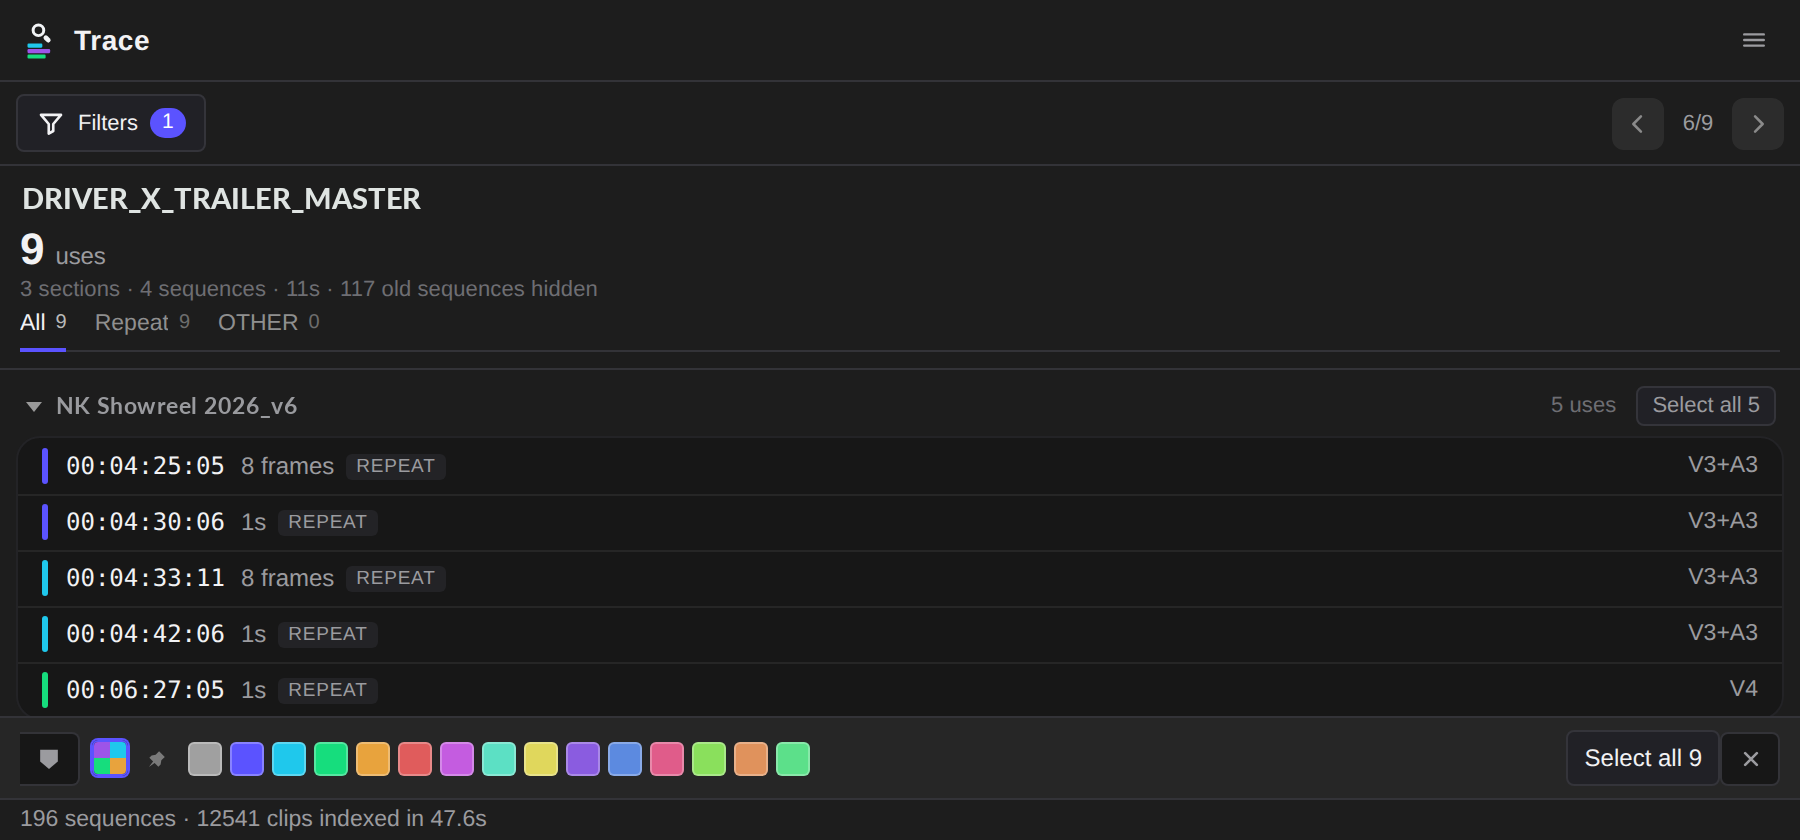
Hover the chip and the colours appear; move away and they go after about half a second. Click the pin beside them to keep them open while you label several clips in a row. Docked wide they lay out along the bar itself; docked narrow they open above it instead and, pinned, push the list down rather than covering the names you are trying to read.
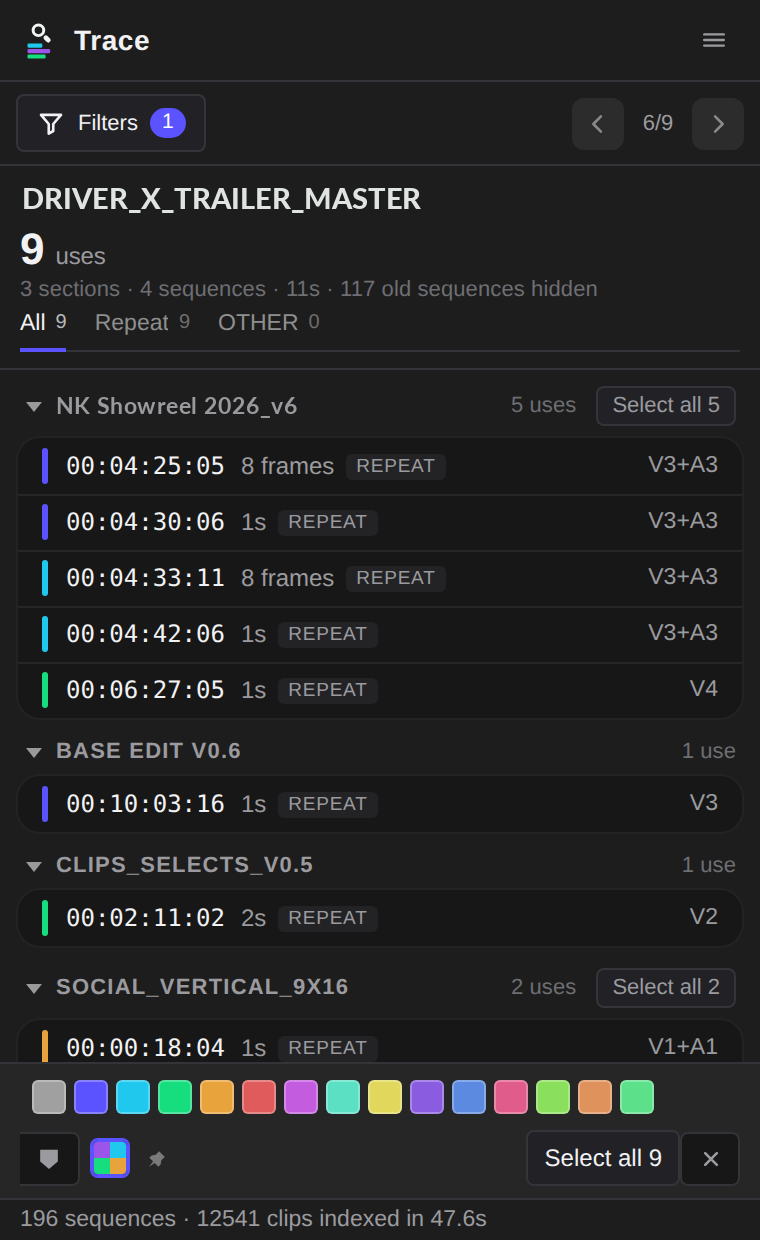
It colours the master clip, not the clips in your timeline. Premiere has no way for a panel to set a track item’s label. Instances take the master’s colour by Premiere’s own rule — which is what people mean when they ask for this — but an instance somebody has already recoloured by hand keeps its override.
The Source Monitor
Shift-click or double-click any use to open that clip in the Source Monitor with the used section marked as in and out points, so you are looking at exactly the stretch Trace is describing.
This changes your project. In and out points on a clip are what you get when you drag it into a timeline afterwards, so setting them is a real edit — one Cmd/Ctrl+Z to undo, and Trace says so in the status line when it happens.
Markers and this are the only two things Trace ever writes. Everything else it does is a read.
Copying the list
☰ > Copy list puts what is on screen on the clipboard as plain text — sequence names, timecodes and durations — for an email, a note, or a message to whoever asked you where that clip went. There is no CSV and no report file; if you need one of those, see Trace+.
Reporting a bug, or asking for something
☰ > Send feedback sends a message straight to me from inside the panel, along with your Trace, Premiere and system versions — never a file path, a project name, or anything from your timeline. Nothing is sent unless you type something and press Send.
☰ > Scan report is the diagnostic behind it: what Trace found, how long it took, and which of Premiere's APIs answered. If something looks wrong, that report is the single most useful thing you can send.
Updates and About
Trace checks once a day whether a newer version exists and shows a small notice in the panel if so. About Trace > Check for updates asks immediately.
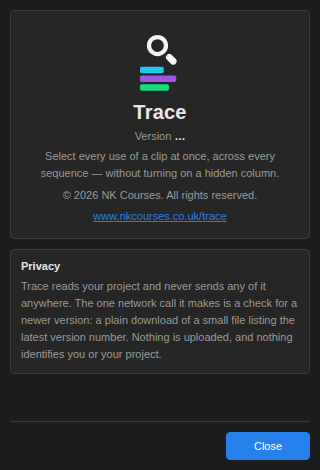
☰ > About Trace shows the version you are running — the first thing to quote if you report a problem — along with a link back to this site.
Release history
Loading releases…
What Trace can't do
Not oversights. Premiere's plugin API genuinely does not offer these, and no plugin can do them.
| Why | |
|---|---|
| Reveal a clip in the Project panel | The Project panel's selection is
read-only to plugins — the timeline's is read-write, and that split is deliberate rather
than a gap waiting on an update. Re-checked on 13 August 2026 against Premiere's own type definitions for
both the shipping 26.3 API and the unreleased 26.5 beta: no reveal, no scrollTo,
no way to set a Project panel selection, and none of the 78 undoable actions comes close. Premiere's own
Reveal in Project command cannot be triggered either.
So Trace does the two halves it can: it shows you the bin under the clip name, and Find in Project — the button beside it, or Alt-click on any row — copies the exact name for the Project panel's Find box. It is called Find rather than Reveal because that is what it does. |
| Colour or tint clips in the timeline | Colour labels are project-item only. Selection and markers are the two visual channels a plugin gets. |
| Zoom or scroll the timeline | No API. Moving the playhead is the only navigation, and Premiere scrolls to follow it. |
| Resolve merged clips | Nothing exists for reading the sources inside one. See above. |
| Appear in Premiere's own Keyboard Shortcuts list | A UXP plugin's
commands cannot be bound in Edit > Keyboard Shortcuts, and Adobe staff confirmed in
April 2026 that this is not planned. This is narrower than "no shortcuts at all", which is what this page used to say and what most people will tell you. A UXP hybrid plugin — one carrying a small native add-on, Premiere 26.2 and up — can register a shortcut with the operating system, which is how the plugins that do have one manage it. Trace does not ship a native add-on today. |
| Search other or unopened projects | The API cannot reach a project that is not open. Productions are out for the same reason. |
| Park the Source Monitor on the exact frame | Needs Premiere 26.3. Trace marks the used range as in/out instead, which shows you more. |
FAQ
What happens with nested sequences?
Trace follows the clip into the nest and back out again — and the second half is the part
nothing else gives you. A clip inside Nest A, where Nest A is cut into your master, is
reported twice: once at its position inside the nest, and once at the timecode it
lands on in the master, labelled via Nest A. Native reports the first and never
mentions the second, which is the sequence you are actually working in. Nests inside nests are
followed six levels deep.
The edge cases are answered honestly rather than optimistically, because a confident wrong timecode sends you to the wrong frame:
| The nest is trimmed past the use | Not reported. The master genuinely does not contain it, and a missing row beats an invented one. |
|---|---|
| The nest is retimed | Mapped, divided by the speed, and marked ~ with
a note under the totals — approximate, and it says so. |
| The nest is reversed | Not mapped. The arithmetic depends on where the reversal's boundaries sit, and guessing would be a confident lie. The row is flagged instead. |
| A nest inside a nest | Followed, to six levels, with the whole chain named in the
row: via Nest B → Nest A. |
Selecting the nest itself asks a different question — what is in it — and Trace+ answers that one.
What happens with multicam clips?
Trace finds every place the multicam clip itself is used, and says plainly that it has not looked inside it. The angles within are not resolved: select angle 3's original camera file and Trace will not report the multicam edits that use it.
This is a limit of Premiere, not a shortcut. Adobe, on the record: "There are no ExtendScript APIs around multi-cam, and there never will be." A multicam source does appear in the project as a sequence, which may one day be a route in — that is an untested possibility, not a promise, and even then nothing exposes which angle a clip is currently switched to. Rather than quietly report a number that is too low, Trace flags the clip under the totals.
What happens with subclips?
They work, and the wording is careful on purpose. Select a master clip and Trace also finds the uses of its subclips, matched on the shared media file — which is the case that otherwise reads as a broken plugin, because you know you used that footage.
What it will not do is call them subclips. Premiere exposes no API for the relationship between a subclip and its master, so the same test also matches a second import of the same file. Those rows say same media file and name the item they came from. A slightly vaguer true answer beats a precise wrong one, and either way the thing you wanted to know — you used this footage over there — is on screen.
What happens with audio?
Audio is indexed with video, and a synced clip counts as one use, not two. Video on V1 with its audio on A1 is two track items pointing at one source, so a naive count doubles — and the count is the whole point of the panel. Trace merges them where they overlap by more than half, so a J-cut or an L-cut stays one use and reports the full on-screen range. Two genuinely separate edits of the same clip, back to back, do not overlap enough to merge and stay two.
Audio-only sources — a music cue, a voiceover — never find a video partner and are reported on their own, with the audio track number on each row. If your Premiere build refuses to identify audio clips at all, Trace says so in the scan report and tells you the index is video-only, rather than silently returning a smaller number.
Does Trace change my project?
Only if you ask. Markers and in/out points are the ceiling, both one undo away. It never moves, renames, copies, consolidates or deletes anything.
Is it really free?
Yes — no account, no key, no trial, no expiry. Trace+ is the paid panel, and it is a different question rather than a bigger helping of this one.
Troubleshooting
Trace isn't in the Window menu
Restart Premiere after installing — it only looks for new panels at startup. Then check Window > UXP Plugins, not Window > Extensions. If it is still missing, confirm you are on 25.6 or later under Premiere Pro > About Premiere Pro.
Double-clicking the .ccx did nothing, or said “Creative Cloud cannot open files of this type”
Creative Cloud Desktop has to be installed and signed in. Open it first, then double-click the file again. That fixes most cases.
Still not working? Nothing is wrong with the file. Install it with Adobe’s own plugin installer instead, the same one Creative Cloud uses behind the scenes. Quit Premiere first.
Mac: open Terminal (Applications > Utilities), paste this one line and press Return. It downloads the latest Trace and installs it:
curl -fL -o /tmp/trace.ccx https://github.com/nkcourses/trace_updates/releases/latest/download/trace.ccx && "/Library/Application Support/Adobe/Adobe Desktop Common/RemoteComponents/UPI/UnifiedPluginInstallerAgent/UnifiedPluginInstallerAgent.app/Contents/MacOS/UnifiedPluginInstallerAgent" --install /tmp/trace.ccx
Windows: open Command Prompt (not PowerShell), paste this one line and press Enter:
curl -fL -o "%TEMP%\trace.ccx" https://github.com/nkcourses/trace_updates/releases/latest/download/trace.ccx && "C:\Program Files\Common Files\Adobe\Adobe Desktop Common\RemoteComponents\UPI\UnifiedPluginInstallerAgent\UnifiedPluginInstallerAgent.exe" /install "%TEMP%\trace.ccx"
When it finishes, restart Premiere and look under Window > UXP Plugins.
No Creative Cloud Desktop at all? The free ZXP/UXP installer works too. Still stuck? Email me and I will sort it with you.
It says 0 uses and I know I used that clip
Three things do this, in order of likelihood:
- The uses are in archived sequences. Open Filters and untick Hide old cuts.
- Active sequence only is on. The Filters button carries a count when a filter is holding rows back — if it says 2, something is hidden.
- It is a merged or multicam clip. Trace flags this under the totals — see above.
- The sequence has never been opened in this session. Use ☰ > Re-scan project.
The numbers look out of date
Trace re-scans on its own as you edit, but ☰ > Re-scan project forces it. If a forced re-scan changes the answer, that is worth telling me about.
Clicking a row moved the playhead but selected nothing
Almost always means the clip has been trimmed or moved since the last scan. Re-scan and try again.
The panel is squashed or the buttons overlap
Drag the dock wider or taller. Trace is happiest in a normal side column — give it a bit more room and the row will lay out properly again.
 Need more control?
Then Trace+ may be just for you.
Both search your whole project. The difference is how many clips they answer for — and what you can do about the answer.
| Trace | Trace+ | |
|---|---|---|
| You give it | One clip | Nothing, a sequence, or the project |
| It answers for | That clip, everywhere | Many clips at once |
| The question | Where is this used? | What is reused, what is not used, what can go |
| Depth | The list | The list plus the analysis — coverage, totals, archive weight |
So Trace+ is not "Trace with a bigger search". Trace already searches everything. Trace+ asks a
different question — one clip at a time versus all four hundred at once — and then
does something about the answer: files the unused media into _UNUSED, tells you what
your archive would weigh without it.
Trace+ has everything Trace has, and more. Nothing you learn in Trace is wasted, and nothing you can do here disappears there. The deeper reading of a single clip — the source coverage bar, which draws the whole clip with the used parts filled in and tells you the longest stretch you have never touched — is a Trace+ feature.

Feature by feature
| Trace | Trace+ | |
|---|---|---|
| Every use of one clip, across every sequence | Yes | Yes |
| Select every instance at once | Yes | Yes |
| Follows nests, subclips and audio | Yes | Yes |
| Markers, Source Monitor, copy list | Yes | Yes |
| Hide old cuts | Yes | Yes |
| Every media file in the project, used and unused | — | Yes |
| How many gigabytes of it are sitting on disk | — | Yes |
File it away into _UNUSED | — | Yes |
| Put it back where it came from — when an archived clip is cut back into the edit, back to its original bin, rebuilding that bin if it was deleted. Automatically, if you want it to | — | Yes |
| The source coverage bar — the coloured strip showing which parts of a clip you have used, and the longest stretch you never touched | — | Yes |
| What one sequence reuses, ranked | — | Yes |
| Compare two cuts — what is in v04 that is not in v03, which clips both of them lean on, and what changed | — | Yes |
| Label by rule — colour everything unused, heavy, offline or duplicated in one press | — | Yes |
| Narrow the list to the cut you have open | — | Yes |
| Media imported more than once · offline media | — | Yes |
| Find empty bins — and remove them | — | Yes |
| Colour labels: read every clip's, set them in bulk | Set, one clip | Read and set, in bulk |
| Markers over every use | One clip's uses | Every clip in a sequence · a colour per press · and removes them again |
| Export CSV — including a cue sheet with screen time per clip | — | Yes |
| Warns when merged/multicam clips make the unused list unreliable | — | Yes |
| Report a bug or an idea from inside the panel | Yes | Yes |
| Deletes any media, ever | Never | Never |
Everything Trace does, Trace+ does too. Nothing you learn here is wasted and no habit disappears — the paid panel is the same engine asked a bigger question.
If you have seen the coloured coverage bar in Trace, it is not there any more. Early builds drew it under the totals: the whole source clip, with the parts you had used filled in, reading 68% of the source used · longest untouched 4m 12s. It moved to Trace+ on 12 August, before Trace was released.
It is the clearest example of where the line between the two panels sits. Trace answers where is this clip? — a lookup. The bar answers how much of this clip have I ever touched? — an analysis of the same clip, and analysis is what Trace+ is for.
Trace+
See every clip your project no longer needs — and every clip it can’t do without.
Get Trace+ Trace stays free, complete and finished. It is not a trial. Trace+ is a superset — it answers everything Trace answers and more — so installing it does not disturb Trace, and you can keep the free panel or remove it, whichever suits your workspace.Privacy
Nothing about your project leaves your machine. Neither panel uploads, logs or phones home about your media, your sequences, your file paths or your project name. There is no analytics, no account and no telemetry.
Both panels make exactly one network request, and only when you ask for it or when the once-a-day update check runs: they fetch a small file from nkcourses.github.io that says whether a newer version exists. Nothing is sent with it.
Trace reads your project — the sequences, the clips on them and where they came from. It never opens a media file.
Trace+ reads the same, plus the size of the media files your project points at, which is where the archive-weight figure comes from. That needs filesystem permission, and it is a bigger ask than the free panel makes, so it is worth saying plainly what it does not do: it never reads a file's contents. Only how many bytes long it is.
The Scan report in the panel menu is the one place your file paths appear, and it goes to your clipboard — nowhere else. Read it before you paste it into an email.
Support
support@nkcourses.co.uk. Quote the version number from ☰ > About Trace and say what you selected and what you expected — that is usually enough to find it. I am one person, so it might take a day, but it will be me answering.